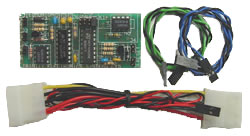
About This Product
This watchdog card monitors the Hard Drive Activity LED and resets a programmable timer every time the hard drive is accessed. If there is not at least one hard drive access within the selected period of time, the watchdog will reboot the computer by essentially closing the reset switch with a relay. The card is intended for any computer (PC, Mac, other) in which no hard drive activity would indicate a fault or a “hung” computer. It does not require any software.
Requirements
Any PC with a remote Hard Drive Activity LED and a reset switch.
Works with any operating system (DOS, Windows, Linux, Mac, Amiga).
Hardware solution – no special software required!
Check to ensure that you have received the following items:
1 – Watchdog card with double sided mounting tape.
1 – Hard drive power cable in a “Y” configuration.
1 – Green/black twisted cable with a two pin connector on each end.
1 – Blue/black twisted cable with a two pin connector on each end.
Tools required:
Screwdriver (if required to remove the cover).
Wrist strap (if a wrist strap is available, it is always a good policy to use it).
Instructions
To begin:
If you have a wrist strap, put it on and connect it to a convenient ground point on the computer chassis. If you do not have a wrist strap, try to touch the computer chassis continuously while working inside. Keeping yourself grounded by touch or with a wrist strap will minimize the chance of electrostatic discharge damage.
Remove the card from the static shielding bag and gently uncoil the cables. Place the Watchdog on the bag which can be used as a temporary static dissipative work surface. There are three cables: a hard drive power Y-cable for 5VDC and ground, a green/black cable which attaches to the reset switch header on the motherboard, and a blue/black cable which connects to the Hard Drive Activity LED connector on the drive controller board.
Setting response time:
The maximum allowable time between the hard drive accesses (before the computer is reset) is programmable. The time settings are 1 minute, 5 minutes, 10 minutes or 20 minutes. Choose one of the four time periods based on the minimum time between hard drive accesses. Most systems will be best served by the 5, 10 or 20 minute settings. Place the jumper over the two pins that correspond to your chosen time as shown on the installation diagram. DO NOT INSTALL MORE THAN ONE JUMPER AT A TIME. Adding an extra jumper will not change the time period but it will damage the circuitry!
Installing the Watchdog Card:
- Turn off the computer and remove the cover. Attach the wrist strap or ground yourself to an earth point if you have not already done so.
- Locate the wires coming from the Reset Switch and the Hard Drive Activity LED. If there is any possibility of confusing the locations, make a quick sketch on a piece of paper or mark the boards with a felt pen.
- Choose a mounting location for the card. The side of the power supply is a good choice. Check the location by extending the cables and verifying that each one reaches its intended location. Also ensure that the time setting jumper is accessible.
- Peel off the backing from the adhesive tape on the back of the card; be careful not to pull the tape from the card. Place the board into its location and press firmly to anchor the tape. Choose carefully because the tape cannot be used a second time.
- The four conductor Y-cable supplies power to the card. Locate a spare power cable or unplug a hard drive (or a cd-rom/dvd drive) power cable and insert the Y-cable between the two connectors. The red and black wires connect to J1 on the PC Watchdog Card,with the red wire to the “+” sign (outside of the card) as shown on the diagram.
- Unplug the reset switch connector from the motherboard (noting its position) and plug it onto connector J4 on the Watchdog Card (orientation does not matter). Plug one end of the green/black cable to J5 on the Watchdog Card, the other end to the reset switch connector on the motherboard. Orientation does not matter.
- Unplug the Hard Drive Activity LED cable from the connector on the drive controller board (or motherboard) while noting its position and plug it onto connector J3 on the Watchdog Card. (The polarity of this cable does matter. If it is connected backwards, no damage will occurr, but the watchdog and LED may not work.) Attach either end of the blue/black cable to the Hard Drive Activity LED connector on the drive controller board (or motherboard), and the other end to J2 on the Watchdog Card.
- Tidy up the cables so that they do not interfere with the other cards and cables.
- With the cover still off, power up the computer and let it proceed through the boot-up process. Watch the Hard Drive Activity LED. If it is not blinking with the sound of the hard drive head, the LED connector J3 is reversed. Simply remove it, turn it 180 degrees and re-connect it. The LED should now light with hard drive activity.
Testing:
Start the computer with a plain autoexec batch file that does not call a hard drive accessing program. Simply entering the DOS or Windows environment is fine. Use a stop watch or clock to measure the time. The computer should re-boot about the time selected by the jumper – note that these times are not precise and can vary 20%. If the computer fails to reboot, turn the power off and re-check each cable one by one. Once operation is verified, replace the cover. Since the Watchdog monitors only the Hard Drive Activity LED, no additional software is required.